How to Fix High CPU Usage By MsMpEng.exe in Windows 10 - Pdf Slider

Use the following fixes to reduce the Antimalware Service Executable's high CPU use. The most recent Windows 10 update was used to write our procedures.
Fix #1: Scan your Razer Computer for Malware
To be sure that your system is not currently compromised with malware, we advise conducting a security scan. It's possible for some malicious scripts and programs to increase Windows Defender's memory consumption. You can also be a target of a cyberattack if you see high CPU and disc utilization.
We'll run a system scan using the available and integrated Windows Defender. A more specialized third-party antivirus program might function better, though. To check your Razer computer for malware using Windows Defender, perform the following steps:
- Open the search bar in your taskbar by clicking on the magnifying glass icon. You can also bring it up with the Windows + S keyboard shortcut.
- Type in Windows Security and launch it from the search results.

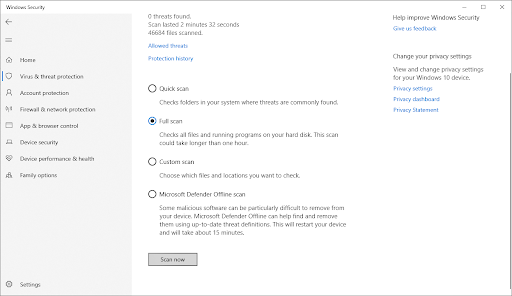
3. Select the Full scan option. This will check every single file on your drives to ensure no threats can be hidden. Take note that this scan may last over 1-2 hours, depending on how many files you have on your system.

4. Click on the Scan now button to begin the scan. If a threat is detected, Windows 10 will automatically quarantine or remove it entirely. You can review the scan results afterward to see what infected files were removed.
5. Switch to the Virus & Threat Protection tab using the home screen or the menu in the left-side pane. Click on the Scan Options link.
Fix #2: Change Windows Defender Scheduling settings
A number of Windows users who report high CPU usage by MsMpEng.exe say it occurs during a full system scan. To sort these issues out, you can reschedule the scan to occur when you’re not using your Razer PC:
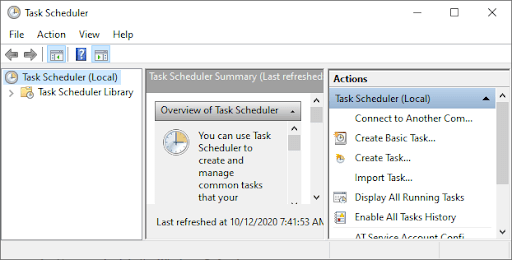
- Open Windows search and type Task Scheduler.
- On the Task Scheduler screen, navigate to the left pane and double-click Task Scheduler Library.
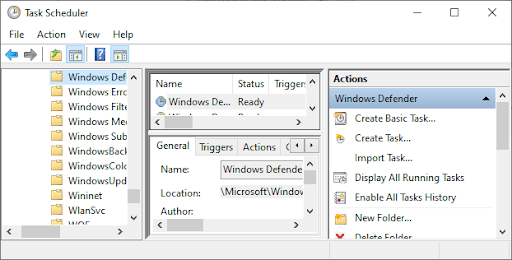
- Expand the folders as you navigate the following path:
Library/Microsoft/Windows/Windows Defender.
- In the Windows Defender folder, locate Windows Defender Scheduled Scan in the middle pane and double-click on it.
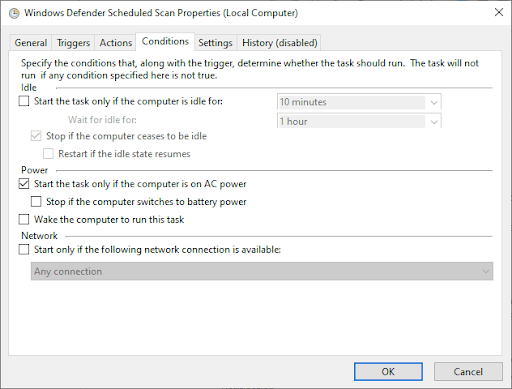
- On the new Window, go to the Conditions tab, and then click OK and uncheck all options. This will clear the scheduled scans on your Razer PC.
- Now, reschedule the Windows Defender scans.
- Again double click the Windows Defender Scheduled Scan.
- Got to the Triggers tab and then click New.
- Next, create a new scan schedule - either weekly scans or monthly scans depending on what suits your needs and enables you to balance protection and system efficiency.
- Now, choose the Day of the scan and click OK. Make sure the scan is enabled.
- Repeat the same process for the other three services: Windows Defender Cleanup, Windows Defender Cache Maintenance, and Windows Defender Verification.

This process will re-schedule your Razer PC’s Windows Defender to function as per your preference. Restart your PC and see if the Antimalware Service Executable is still using a high CPU.
FIX #3: Add Antimalware Service Executable to the Windows Defender’s exclusion list
Windows Defender scans every file on your Razer PC, even itself, which frequently causes system slowdown. Simply adding Windows Defender to the exclusion list prevents it from being scanned by Windows Defender.
- Open Task Manager by pressing Ctrl + Shift + Esc (or right-click the Taskbar and select Task Manager).
- In the list of items, locate Antimalware Service Executable > right-click on it and select Open File Location.
- Copy the full path of Antimalware Service Executable on the address bar.
- Now, open the Windows Start menu and type “windows defender” then click the top result to launch Windows Defender Security Center.
- Next, click on Virus & threat protection > then on Virus & threat protection settings, click Manage settings.
- Now, scroll down to “Exclusions,” then click Add or remove exclusions.
- Click Add an exclusion, select the Folder option, then paste the Antimalware Service Executable (MsMpEng.exe) path you copied from the address bar.
- Now, click Open.

The Antimalware Service Executable folder will not be scanned as a result of this procedure. This method corrects a known problem with the scans that Windows Defender runs in real-time protection mode rather than removing the Antimalware Service Executable.
Fix #4: Disable Windows Defender Service
You might need to turn off Windows 10's Antimalware Service Executable if the issue with MsMpEng's high CPU consumption remains. If you don't already have a third-party antivirus application installed, be aware that uninstalling Windows Defender may leave you open to several cyberattacks.
When you're prepared, follow the detailed instructions below to completely disable Antimalware Service Executable.
To disable Windows Defender (through the registry editor):
- Press Wins Key + R to open Run Dialog Box.
- Type Regedit and click OK to open the Registry Editor.
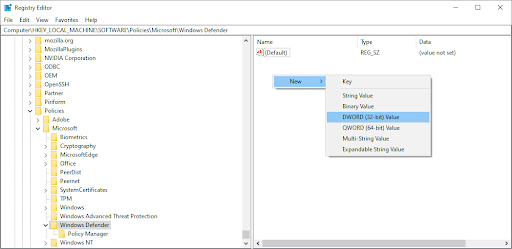
- Check the left navigation pane, and double-click the folders to navigate to the following path:
HKEY_LOCAL_MACHINE\SOFTWARE\Policies\Microsoft\Windows Defender. - Locate a registry entry named DisableAntiSpyware > then double click it and set its value data to 1.
- If there is no registry entry named DisableAntiSpyware, go back to the main Registry Editor pane and right-click on it > select New > DWORD (32-bit) Value.
- Now, name the new registry entry DisableAntiSpyware > double click it and set its value data to 1.

Fix #5: Roll Back Windows Defender Definition Updates
In rare circumstances, Windows Defender may receive a subpar definition update, which results in the virus detection of specific Windows 10 files. If many false positives occur at once, your system may become easily overloaded. Here's how to uninstall a corrupt Windows Defender definition update.
- Open the search bar in your taskbar by clicking on the magnifying glass icon. You can also bring it up with the Windows + S keyboard shortcut.
- Type Command Prompt in the search box. When you see it in the results, right-click on it and choose Run as Administrator.
- When prompted by the User Account Control (UAC), click Yes to allow the app to launch with administrative permissions.
If you need help, check out our How to make a local user an administrator in Windows 10 guide. - Once the Command Prompt window is open, type in the following command and press Enter to execute it: "%PROGRAMFILES%\Windows Defender\MPCMDRUN.exe" -RemoveDefinitions -All
- After the first command finishes running, input the following one and execute it with the Enter key: "%PROGRAMFILES%\Windows Defender\MPCMDRUN.exe" -SignatureUpdate
- You can now check if the Antimalware Service Executable (MsMpEng.exe) high CPU usage has decreased.
If you carefully follow the steps we’ve described in this article, you’ll take control of the Antimalware Service Executable on your Razer PC and keep your computer running at full speed. Aside from that, contact the Razer Repair Service Center USA if you need assistance with antimalware service or other software or setting issues. Our qualified staff team is always available to resolve your issues.
Source: https://medium.com/@soniasen1453/razer-synapse-not-working-how-to-fix-it-bdb5f12ef455

Also, Read Using the Razer Ripsaw HD, how can I fix the PS4's black screen (no signal)?

Sonia Sen
Sonia Sen is my name. I am an employee of a Brother repair service center in the US. In this position, I'm an SEO analyst. Every client's digital marketing effort falls under my purview. My team members have already worked on my project, which requires keyword research and submission to search engines for ranking purposes.
YOU MAY ALSO LIKE

Twitch is The Difficulty of Massive Hacking: Source Code, Passwords, Remuneration of Creators, etc.
Popular game streaming site Twitch has suffered a big records breach. Data together with all Twitch supply code, writer pay, passwords, account credentials, emails, and greater. Leaked on-line.

Revamp Your Tech Workforce: Tips To Future-Proof Your Company
Revitalize your company's future by revamping your tech workforce. Explore valuable tips to future-proof your business through strategic workforce enhancements and technological advancements.

What is a Bluetooth Speaker For Car Use?
Bluetooth is a short-range technology for communication that wirelessly connects devices. Also, it's an exclusive system that lets your phone connect to your printer, computer, or portable speakers, without the requirement to connect cables.
Similar Links

Intex i-Buddy Connect II 3G tablet launched at Rs 7,500
Intex announced the launch of the i-Buddy Connect II 3G tablet in India. It is priced at Rs 7,500.

Understand Collision Domain and Broadcast Domain
Understand Collision Domain and Broadcast Domain with example and video tutorial . Step by step explaination

leading no.1 hosting company Top 10 Tips for to inrease your website traffice and roi
1. Offer free, original, and quality content on your site. 2. Supplement your original content. 3. Trying to get more backlinks on your website this may help to increase the traffic 4. Improve your search engine ranking 5. Get linked. 6. Use social
Similar PDFs

Best Crypto Wallet: Jaxx Wallet and GateHub Wallet
A crypto wallet is essentially any application that incorporates features for storing and managing coins. A thorough explanation of how wallets function, as well as a review of the many types of crypto wallets and their applications. It's vital to remember that cryptocurrencies are stored on the blockchain, not in the wallet. A publicly viewable address is provided to each coin/token on the blockchain. Block explorers can be used to look at these addresses. Aside from privacy, coin records, transaction histories, and address balances are open to the public. A complicated mathematical method generates the public address from the private key. The process of producing a private key from a public key is nearly impossible to reverse. The coins are only accessible to the owner of the private key.

Online Science Classes in Kuwait
Physics contains so many difficult topics like Lights, Motion, Newton’s Laws, Archimedes Principle, and magnetic circuits, etc. These subjects become so boring in lack of the best tutors. This is why our best Online Physics Tutors in Kuwait provide ultimate content for those students. The process of joining our classes is very simple. Either you can take by sending an inquiry through the website, or you can also directly call us. Our customer care team will contact you in a flash. The students may also take Demo Classes for Physics

A Brief Explanation about Assignment Help Sydney
Students know that copied work is not accepted in universities. It is not acceptable because an assignment is given marks on the basis of your unique research skills. If you select Assignment help Sydney, you get plagiarism-free and unique work. For more info visit here: https://www.myassignmenthelpau.com/assignment-help-sydney